Showing posts with label children's gift. Show all posts
Showing posts with label children's gift. Show all posts
Tuesday, March 19, 2013
Crayon rolls
Monday, January 21, 2013
Hopscotch mat tutorial
Want to make your own hopscotch mat? They're great for playing indoors on cold or rainy days, are machine washable, and roll up for easy storage. (Thanks to my friend Bethany for the idea!)

Materials:
12" x 14" pieces of fabric:
- x 10 cotton print
- x 10 white muslin
85" x 36" medium or heavy weight fabric for the mat (I used an old curtain panel)
Twill tape, ribbon, or bias tape
Scissors
Iron
Disappearing marking pen or chalk
Fusible webbing/tape
Fabric turner
Fiber-Lok Non-Skid Rug Backing
Cardboard toilet paper roll
Paint brush
Instructions:
Fold the long sides of the mat fabric over 3/4" and press. Fold another 3/4" and press again. Sew along inner edges. Repeat for one short side of the fabric. Before hemming the second short side, tuck the twill tape under the hem, 5 1/2" in from the long side of the mat. Make sure one piece of twill tape is pulled away from the fabric. Sew along inner edge of hem, then sew along outer edge of hem where the twill tape is pulled away from the fabric.
Pin together each 12" x 14" cotton print to a 12" x 14" piece of muslin, right sides together. Sew around the edges with a 1/2" seam allowance. Do not leave an opening.
Clip the corners and cut a 4" slit in the muslin, 3" in and parallel to the long side of the rectangle. Turn right side out by pulling the printed fabric through the slit. Push out corners with a fabric turner. Press.
Print numbers and cut out. I used Myriad Pro font, size 400, or you can download the number template here. Trace the numbers onto the fronts of each rectangle using chalk or a disappearing marking pen.
Using a zig-zag stitch, stitch around the outline of the number. I used the following sewing machine settings:
Tension: 3
Length: 0.4
Width: 3.0
Cut away the printed fabric inside the number, being careful not to cut through the muslin.
Pin the rectangles onto the mat then secure with fusible webbing. This will keep them in place while sewing. Sew rectangles onto mat.
If you like, you can use scraps of fabric to create a small bean bag and pocket to store it in. The pocket closes with velcro and the bean bag is filled with rice.
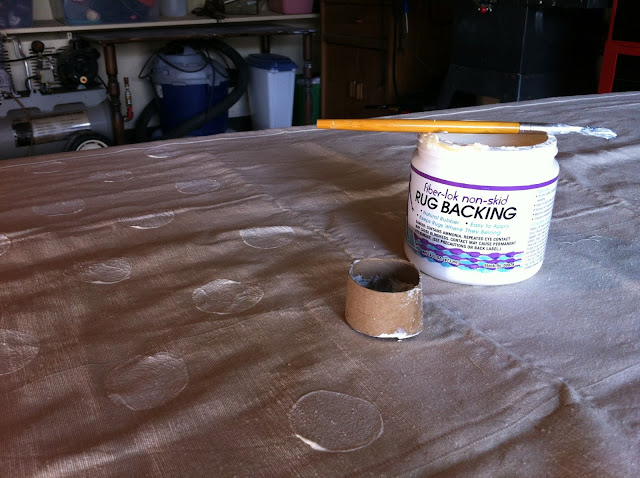
The last step is to add non-slip rug backing to the mat. Cut off the end of a toilet paper roll to create a round stencil. Using the toilet paper roll stencil, paint the rug backing onto the back of the mat in a polka-dot pattern. (Use in a well ventilated area because it has a pretty strong smell.) Let dry overnight.
The finished hopscotch mat:
 |
| Front |
 |
| Front |
 |
| Back |
 |
| Roll up and tie with twill tape to store |
Tuesday, December 27, 2011
Fort Building Kit
Growing up, my brother and I dished out quite a bit of abuse on the living room furniture, from building forts to playing Hot Lava. I came across a fort building kit on one of the craft blogs I read and thought it would make a great children's gift. Of course my three nieces are always the guinea pigs lucky recipients of my handmade children's gifts, so this year for Christmas I made them their very own fort kit.
I bought all of the supplies, except the sheets, at the dollar store. Then, during a trip to IKEA (to buy the bins for our laundry room), I was super excited to find three cute curtain panels in the clearance section. I hadn't thought to use curtain panels but they ended up being better than sheets, with the added bonus of tabs at the top, which meant more places to attach the ties and clips.
I made bias tape out of some cotton fabric I had on hand, and used it to add looped ties to each curtain panel.
In my ever-expanding stash of fabric I had some vintage linens, including a small floral printed pouch and an embroidered pillowcase. The pillowcase was turned into a tote bag to hold the "sheets" and supplies.
I opened up the top hem of the pouch and added a ribbon, turning it into a drawstring bag to hold all the supplies.
Using a black paint pen, I wrote inspirational words on the clothespins (idea found here).
I also included a tag to explain what the gift was. I pretty much copied the tag from the tutorial, but changed up the font and colors a bit.
I bought all of the supplies, except the sheets, at the dollar store. Then, during a trip to IKEA (to buy the bins for our laundry room), I was super excited to find three cute curtain panels in the clearance section. I hadn't thought to use curtain panels but they ended up being better than sheets, with the added bonus of tabs at the top, which meant more places to attach the ties and clips.
I made bias tape out of some cotton fabric I had on hand, and used it to add looped ties to each curtain panel.
In my ever-expanding stash of fabric I had some vintage linens, including a small floral printed pouch and an embroidered pillowcase. The pillowcase was turned into a tote bag to hold the "sheets" and supplies.
Using a black paint pen, I wrote inspirational words on the clothespins (idea found here).
I also included a tag to explain what the gift was. I pretty much copied the tag from the tutorial, but changed up the font and colors a bit.
Subscribe to:
Comments (Atom)


