A huge thanks to all my wonderful customers who helped Minnie Millery reach 100 sales! Enjoy 10% off any item in my shop, through August 12th, when you enter coupon code ONEHUNDRED.
Showing posts with label etsy. Show all posts
Showing posts with label etsy. Show all posts
Saturday, July 12, 2014
Tuesday, October 29, 2013
Hello Aunt Edna
The fresh fabric combination of this romper has a retro vibe, just like your great Aunt Edna! Made from 100% cotton, the Aunt Edna Bubble Romper features a ruffled waistline and ruffled leg openings, three-button closure at back and hidden four snap closure at bottom. The bodice is fully lined and all seams are professionally finished to prevent fraying. Also available as a dress!
Saturday, October 26, 2013
The Evelyn Top
Made from 100% cotton, the Evelyn Top features a Peter Pan collar, exposed zipper closure at back and drop waist with peplum detail. Fabric tab behind zipper protects little one's skin. Bodice is fully lined and all seams are professionally finished to prevent fraying. Available in sizes 18 months - 4T.
Tuesday, October 8, 2013
Wednesday, September 25, 2013
Monday, September 9, 2013
Friday, September 6, 2013
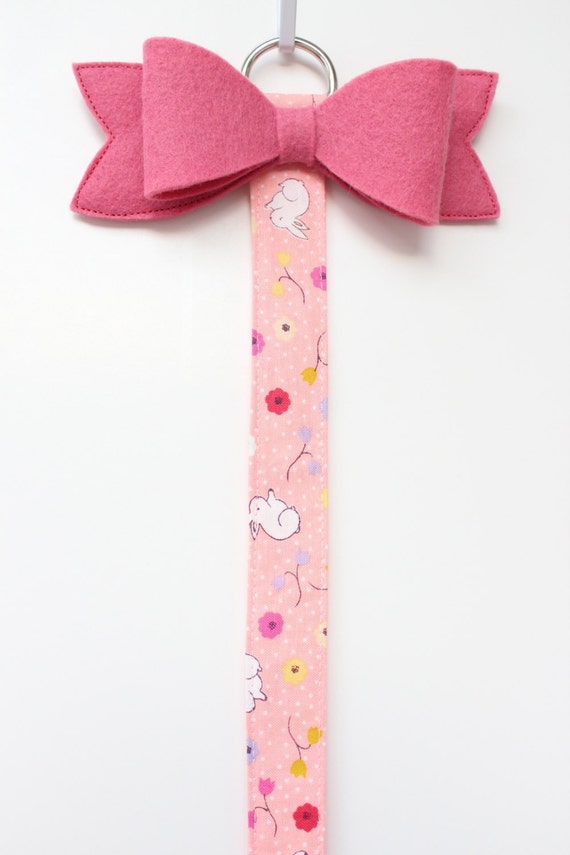
The Big Bow Hair Accessory Holder
Vera's hair accessories have a new home...
I wanted something that could hold her hair clips as well as head wraps, so I added a loop with a velcro closure at the bottom. It can easily hold a dozen or more clips as well as several head bands or head wraps.
Want one? Lucky you! The Big Bow Accessory Holder is now available in my etsy shop. I am slowly but surely adding different designs and colors so check back soon for more options.
Labels:
accessory,
bow,
etsy,
felt,
girls,
hair clip holder,
head band,
head wrap,
minnie millery,
sewing
Thursday, December 20, 2012
Googily
I had someone contact me about making a Googily doll, from the book Jumpy Jack and Googily, by Meg Rosoff. It's her grandson's favorite book and she wanted to give him a Googily doll for Christmas.
I made him out of wool felt, like my other monster softies, but chose to make him a rag doll, with floppy arms and legs.
I made him out of wool felt, like my other monster softies, but chose to make him a rag doll, with floppy arms and legs.
Thursday, June 7, 2012
Felt Corsage Tutorial
Cut the following pieces out of your main felt color:
Corsage ruffle- One 3" x 9" strip
Ribbons- Two 1 1/2" x 6" strips
Corsage backing- One 3" diameter circle
Cut the following pieces out of your accent felt:
Ribbon accents: Two 1" x 6" strips
Corsage face: One 2 3/4" diameter circle
You will also need:
6 1/2" piece of pom pom trim
1 medium sized safety pin
Coordinating thread
Scissors/rotary cutter
Chalk or marking pen
Ruler
Embroidery needle and floss/sewing machine with embroidery function
Directions
1. Embroider the message of your choice onto your corsage face, either by hand or using your sewing machine.
2. Pin the pom pom trim onto the wrong side of the face, near the edge.
3. Temporarily sew in place with a basting stitch. Remove the pins and set aside.
4. Fold the corsage ruffle in half, lengthwise. If necessary, pin to hold in place. Mark off 1" increments at the top of the folded edge. Using scissors, cut 1" notches at each 1" mark.
5. Pin the ribbon accent to the ribbons, lining them up down the middle. fold in half lengthwise and make a mark 1/2" up the folded edge. Cut a v-shaped notch in the bottom, up to the 1/2" mark, through both the accent and main ribbon.
6. Topstitch the ribbon accent onto the ribbon. Match your bobbin thread to your main felt color.
7. Pin the ruffle to the outside edge of the corsage backing. Line it up so the bottom of the ruffle
notches are just inside the edge of the backing. Sandwich the ribbons in between the backing and the ruffle, overlapping the tops of the ribbons slightly (you may need to remove a few pins, but I found it easier to pin the ruffle first, then add the ribbons).
8. Next, sew a safety pin to the back of the corsage. I placed a small piece of felt on the inside for reinforcement. You can do this by hand or with your sewing machine. I used my machine and sewed one stitch forward one stitch backward, multiple times, at three different spots along the safety pin.
9. Sew along the edge of the backing circle.
10. Pin the face to the front of the corsage, centering it within the ruffle. Stitch around the edge with a zig-zag stitch. Match your bobbin thread to your main felt color. (You could also use a straight stitch but I wanted to make sure I caught the pom pom trim in my stitch.)
11. Remove the basting stitches from the face.
I made two of these for the grandmas to be at my baby shower, but they would also be great as name tags at a party or for birthdays or bachelorette parties.
You can purchase your own custom corsage in my etsy shop!
Subscribe to:
Posts (Atom)


